A Chicken Caesar Sandwich That Actually Delivers
If you have ever ordered a chicken Caesar sandwich at a restaurant and thought, I could make this better at home — you were right. The problem most home cooks run into is not the concept. It is execution. The chicken turns out soggy, the breading falls off, or the Caesar dressing drowns everything. This recipe solves all of that, and it does it in under 35 minutes.
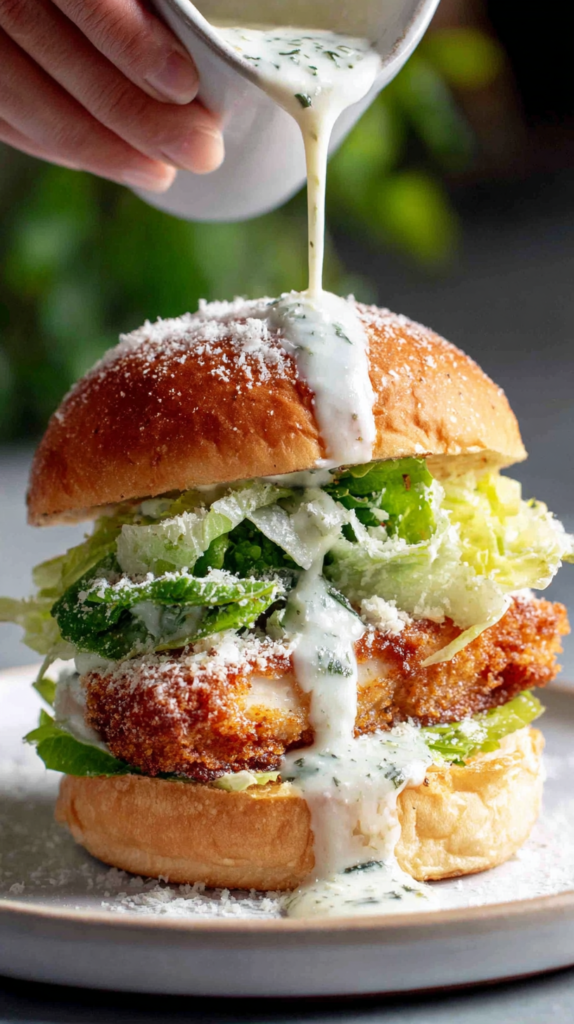
This crispy chicken Caesar sandwich layers a golden-brown, Parmesan-crusted chicken cutlet with cool, crunchy romaine lettuce, tangy Caesar dressing, and shaved Parmesan on a toasted brioche bun. Every component pulls its weight. The result is a sandwich that holds together, hits every flavor note — salty, savory, creamy, crisp — and tastes like something from a proper restaurant kitchen.
For more easy and delicious chicken recipes, explore our collection.
The chicken Caesar sandwich has become one of the most searched lunch and dinner recipes online, and for good reason. It bridges the familiar comfort of a fried chicken sandwich with the bright, sharp flavors of a classic Caesar salad. Whether you are making it for a weeknight dinner, a weekend lunch, or meal prepping for the week, this recipe adapts to your schedule.
Follow the steps below exactly, and you will have a restaurant-quality crispy chicken Caesar sandwich on your table tonight.
Why This Chicken Caesar Sandwich Recipe Works
Most chicken Caesar sandwich recipes fail at one of three points: the breading, the fry temperature, or the assembly order. This recipe addresses all three with precision.
The Parmesan Breadcrumb Crust
Mixing grated Parmesan directly into the Italian-style breadcrumbs creates a crust that is both crispier and more flavorful than plain breadcrumbs alone. The Parmesan melts slightly during frying, binding the crust tightly to the chicken. You get a crunchy, golden exterior that does not slide off after the first bite.
Thin Cutlets for Even Cooking
Slicing each chicken breast horizontally gives you thinner, more even cutlets. Thin cutlets cook through in 4 to 5 minutes per side without drying out in the center. Thick, uncut breasts force you to either undercook the interior or overcook the exterior. Avoid that entirely by cutting them down first.
Caesar Dressing as the Base Layer
Spreading Caesar dressing directly on the bun before stacking the chicken locks moisture into the bread and creates a barrier so the bun does not absorb excess grease from the fried chicken. The dressing also acts as a flavor anchor, pulling the Parmesan, garlic, and romaine into a unified bite.
Assembly Order Matters
The correct build sequence for a chicken Caesar sandwich is: dressing on the bottom bun, crispy chicken cutlet, romaine lettuce, shaved Parmesan, top bun. The lettuce sits on top of the hot chicken so it stays cool and crisp. The shaved Parmesan rests between the lettuce and the top bun where it will not slide around.
Ingredients for the Chicken Caesar Sandwich
These quantities make 4 generously sized sandwiches. All measurements are exact. Do not eyeball the seasoning in the breading — it matters more than you think.
For the Crispy Chicken Cutlets
- 2 large boneless, skinless chicken breasts (about 8 oz each)
- 1 cup all-purpose flour
- 2 large eggs
- 1 cup Italian-style breadcrumbs
- 1/2 cup grated Parmesan cheese (finely grated, not the shaker variety)
- 1 teaspoon garlic powder
- 1 teaspoon paprika (smoked or sweet, both work)
- 1/2 teaspoon fine salt
- 1/2 teaspoon black pepper, freshly ground
- Vegetable oil, enough for 1/2 inch depth in your skillet
For the Sandwich Assembly
- 4 brioche buns or sturdy sandwich rolls
- 2 cups romaine lettuce, chopped into bite-sized pieces
- 1/2 cup Caesar dressing (store-bought or homemade)
- 1/4 cup Parmesan cheese, shaved with a vegetable peeler
Key Ingredient Notes
Chicken Breasts: Buy breasts that are similar in size so your cutlets cook at the same rate. If one breast is significantly larger, pound it gently with a meat mallet after slicing.
Grated Parmesan in the Breading: Use finely grated fresh Parmesan, not pre-shredded. Pre-shredded Parmesan contains anti-caking agents that prevent it from melting into the crust properly.
Italian Breadcrumbs: Italian-style breadcrumbs already contain herbs and seasoning. Panko breadcrumbs can be substituted for an even crunchier texture, but add an extra 1/2 teaspoon of dried Italian herbs if you swap them.
Caesar Dressing: Use a Caesar dressing that lists anchovies, Parmesan, and lemon in the first few ingredients. Brands that list water or soybean oil as the first ingredient tend to be watery and dilute the sandwich flavor.
Brioche Buns: Brioche is the best bun for a chicken Caesar sandwich because the slight sweetness balances the salty Parmesan and the tangy Caesar dressing. It is also sturdy enough to hold a fried cutlet without collapsing.
Required Equipment
You do not need specialized equipment for this chicken Caesar sandwich, but using the right tools makes a measurable difference in the final result.
- Large cast iron skillet or heavy-bottomed stainless steel pan — cast iron holds heat more evenly than thin non-stick pans, which means consistent browning across the entire cutlet
- Three shallow bowls or rimmed plates — for the flour, egg, and breadcrumb stations
- Instant-read meat thermometer — chicken is done at 165°F internal temperature; this is the only reliable way to confirm doneness without cutting into the meat
- Wire rack set over a sheet pan — for draining fried chicken without trapping steam underneath, which causes sogginess
- Sharp chef’s knife — for slicing the chicken breasts horizontally with control
- Tongs — for turning the cutlets without puncturing them
Step-by-Step Instructions: How to Make a Crispy Chicken Caesar Sandwich
Step 1: Prep the Chicken Cutlets
- Place each chicken breast flat on a cutting board. Hold the breast steady with one hand and slice horizontally through the thickest part to create two thinner cutlets of roughly equal thickness. You should end up with 4 cutlets total.
- If any cutlets are thicker than 1/2 inch in any spot, place them between two sheets of plastic wrap and pound gently with a meat mallet or the bottom of a heavy pan until they are even.
- Pat the cutlets completely dry with paper towels. Moisture on the surface of the chicken will steam instead of fry, resulting in a pale, soft crust instead of a golden, crunchy one.
Step 2: Set Up the Breading Station
- In the first shallow bowl, mix the all-purpose flour with 1/4 teaspoon of the salt and 1/4 teaspoon of the black pepper.
- In the second bowl, whisk the two eggs until the yolks and whites are fully combined. Add one tablespoon of water and whisk again to thin the egg wash slightly.
- In the third bowl, combine the Italian-style breadcrumbs, grated Parmesan, garlic powder, paprika, and the remaining 1/4 teaspoon each of salt and black pepper. Mix well so the Parmesan is distributed evenly throughout the breadcrumbs.
For more easy and delicious chicken recipes, explore our collection.
Step 3: Bread the Chicken
- Take one cutlet and dredge it through the flour, shaking off any excess. The cutlet should have a thin, even dusting of flour with no thick patches.
- Dip the floured cutlet into the egg wash, letting any excess egg drip off.
- Press the cutlet firmly into the breadcrumb mixture on both sides. Press down with your fingers so the crust adheres completely. The coating should be thick and even with no bare spots.
- Set the breaded cutlet on a plate or wire rack. Repeat with the remaining three cutlets.
Chef’s Note: After breading all four cutlets, let them rest for 5 minutes before frying. This short rest allows the coating to hydrate slightly and adhere more firmly, which significantly reduces the chance of the crust separating from the chicken during cooking.
Step 4: Fry the Chicken
- Pour vegetable oil into your skillet to a depth of about 1/2 inch. Heat over medium heat until the oil reaches 350°F. If you do not have a thermometer, test by dropping a breadcrumb into the oil — it should sizzle immediately and float.
- Carefully lower two cutlets into the hot oil using tongs. Do not overcrowd the pan. Overcrowding drops the oil temperature and results in greasy, pale breading instead of a crispy, golden crust.
- Fry the cutlets undisturbed for 4 to 5 minutes. You will see the breading turn deep golden brown around the edges. Do not move them or press down on them during this time.
- Flip each cutlet once using tongs and fry for another 4 to 5 minutes on the second side. The crust should be uniformly golden brown and the chicken should feel firm to a gentle press.
- Check the internal temperature with an instant-read thermometer. Insert the probe into the thickest part of the cutlet — it needs to read 165°F. If it is at 160°F, remove from the oil and let it rest on the wire rack; carryover heat will bring it to 165°F.
- Transfer the fried chicken cutlets to a wire rack set over a sheet pan. Never rest fried chicken on paper towels on a flat plate — the trapped steam softens the crust within minutes. Wire rack drainage preserves crunch.
- Fry the remaining two cutlets in the same oil. Let the oil return to 350°F between batches.
Step 5: Toast the Buns
- While the second batch of chicken is frying, split the brioche buns and place them cut-side down in a dry skillet over medium heat. Toast for 1 to 2 minutes until the interior surface is lightly golden. This prevents the bun from becoming soggy after you add the Caesar dressing.
Step 6: Assemble the Chicken Caesar Sandwich
- Spread approximately 2 tablespoons of Caesar dressing on the interior of each bottom bun.
- Place one crispy chicken cutlet on each bottom bun, directly on top of the Caesar dressing.
- Add a generous handful of chopped romaine lettuce on top of the chicken — about 1/2 cup per sandwich.
- Scatter shaved Parmesan cheese over the romaine lettuce.
- Set the top bun in place, press gently, and serve immediately. A chicken Caesar sandwich is at its absolute best eaten within 5 minutes of assembly.
Chef Marco Delgado’s Pro Tips for the Best Chicken Caesar Sandwich
Tip 1: Dry Your Chicken Twice
Pat the chicken dry before breading. Pat it dry again after slicing if any moisture has released. Surface moisture is the single biggest enemy of a crispy crust on any breaded chicken recipe, including this chicken Caesar sandwich.
Tip 2: Season Every Layer
Season the flour, not just the breadcrumbs. When the flour layer is bland, the entire breading tastes flat no matter how well-seasoned the breadcrumbs are. The flour coating is in direct contact with the chicken — make it count.
Tip 3: Use a Thermometer, Not a Timer
Cooking times are estimates because the thickness of your cutlets will vary. The thermometer is the actual measure of doneness. A cutlet that reads 163°F needs one more minute in the pan. A cutlet that reads 170°F is drying out. Check the temperature — every time, without exception.
Tip 4: Caesar Dressing Temperature Contrast
The contrast between the hot, crunchy chicken and the cool, creamy Caesar dressing is one of the main reasons a well-made chicken Caesar sandwich is so satisfying. Do not warm the dressing. Keep it refrigerator-cold and apply it just before assembly.
Tip 5: Shaved Parmesan Over Grated
Use a vegetable peeler to shave thin strips of Parmesan from a block for the sandwich topping. Shaved Parmesan has a different texture and mouthfeel than finely grated Parmesan — it adds visible, clean Parmesan flavor without dissolving into the dressing.
Tip 6: Manage Your Oil Temperature
If you notice the breading browning very quickly — within the first minute — your oil is too hot. Reduce heat slightly. If the breading takes more than 6 minutes to color, the oil is too cool and the chicken will absorb grease. Medium heat and 350°F is the target.
Tip 7: Rest the Chicken Before Assembly
Give the fried chicken cutlets 3 to 5 minutes on the wire rack before building the sandwich. This allows internal steam to escape, which keeps the crust crispy longer and allows the interior juices to redistribute slightly.
Common Mistakes to Avoid When Making a Chicken Caesar Sandwich
Mistake 1: Skipping the Dry-Brine Step
Salting the flour and breadcrumbs but not giving the breading time to set before frying leads to patches where the crust peels away during cooking. The 5-minute pre-fry rest described in Step 3 solves this entirely.
Mistake 2: Frying Multiple Cutlets at Once in a Small Pan
Crowding the skillet is the most common reason home cooks end up with a pale, greasy chicken Caesar sandwich instead of a golden, crispy one. Use a 12-inch skillet and fry two cutlets at a time maximum. If your skillet is smaller than that, fry one at a time.
Mistake 3: Resting Fried Chicken on Paper Towels
Paper towels trap steam underneath the chicken, which softens the underside of the crust within 2 to 3 minutes. Always use a wire rack. If you do not have one, a cooling rack from the oven drawer works just as well.
Mistake 4: Using Pre-Shredded Parmesan in the Breading
Pre-shredded Parmesan is coated in cellulose to prevent clumping. That coating also prevents the Parmesan from melting and binding properly in the crust. Always use finely grated fresh Parmesan in the breadcrumb mixture for a chicken Caesar sandwich.
Mistake 5: Assembling Too Early
A chicken Caesar sandwich assembled 15 minutes before eating will have a soggy bottom bun, wilted lettuce, and a softened crust. Assemble immediately before serving, toast the buns, and eat it within 5 minutes for the best experience.
Mistake 6: Under-Seasoning the Caesar Dressing
Even a good store-bought Caesar dressing sometimes needs a squeeze of fresh lemon juice and a turn of cracked pepper before going on the sandwich. Taste your dressing before assembling and adjust if necessary. The Caesar dressing is the primary seasoning vehicle in this sandwich.

Variations and Substitutions
Make It Gluten-Free
Substitute the all-purpose flour with a 1:1 gluten-free flour blend and replace the Italian breadcrumbs with gluten-free panko. The texture will be slightly lighter but still very crispy. Verify that your Caesar dressing is also gluten-free — some brands use modified starch as a thickener.
Baked Chicken Caesar Sandwich
For a lighter version, bake the breaded chicken cutlets instead of frying them. Preheat your oven to 425°F. Place the breaded cutlets on a wire rack set over a sheet pan and spray generously with cooking spray. Bake for 18 to 22 minutes, flipping once at the halfway mark, until the crust is golden and the internal temperature reaches 165°F. The baked version will not have quite the same crunch as the fried version, but it delivers solid results with significantly less oil.
For more easy and delicious chicken recipes, explore our collection.
Air Fryer Chicken Caesar Sandwich
Preheat the air fryer to 400°F. Spray the breaded cutlets with cooking spray on both sides. Cook for 12 to 15 minutes, flipping once at 7 minutes. The air fryer produces a crust that is close to pan-fried in terms of crispiness while using a fraction of the oil. It is an excellent option if you want a crispy chicken Caesar sandwich on a regular basis without the cleanup involved in skillet frying.
Spicy Chicken Caesar Sandwich
Add 1 teaspoon of cayenne pepper to the breadcrumb mixture and 1/2 teaspoon of hot sauce to the egg wash. Serve with a drizzle of hot honey on the assembled sandwich for a spicy-sweet chicken Caesar sandwich variation that has become increasingly popular in restaurant menus.
Grilled Chicken Caesar Sandwich
Skip the breading entirely and grill seasoned chicken breasts over medium-high heat for 5 to 6 minutes per side. A grilled chicken Caesar sandwich has a cleaner flavor profile and lower calorie count. Season the chicken with garlic powder, paprika, salt, pepper, and a light brush of olive oil before grilling.
Chicken Caesar Wrap
Replace the brioche bun with a large flour tortilla for a chicken Caesar wrap — same fillings, same flavor, more portable format. Warm the tortilla briefly in a dry pan before assembling. Roll tightly and slice diagonally.
Dairy-Free Substitutions
Replace the grated Parmesan in the breading with nutritional yeast in equal measure for a similar savory, umami quality without dairy. Use a dairy-free Caesar dressing and omit the shaved Parmesan topping, or substitute with a dairy-free Parmesan alternative.
Using Chicken Thighs
Boneless, skinless chicken thighs can replace chicken breasts in this recipe for a richer, more forgiving result. Thighs have more fat content and are harder to overcook. Pound them to an even 1/2-inch thickness before breading and frying using the same method.
How to Store and Reheat a Chicken Caesar Sandwich
Storing the Fried Chicken Separately
Store the fried chicken cutlets separately from the buns, lettuce, and dressing. Place cooled cutlets in a single layer in an airtight container lined with paper towels. Refrigerate for up to 3 days. Do not store assembled sandwiches — the bun will become soggy and the lettuce will wilt within an hour.
Storing the Lettuce and Dressing
Keep chopped romaine lettuce in a sealed container with a paper towel to absorb excess moisture. Store Caesar dressing in its original container or a sealed jar. Both keep well in the refrigerator for 3 to 5 days.
Reheating the Chicken Cutlets
The best method for reheating fried chicken cutlets is in an oven or air fryer. Preheat your oven to 400°F and place the cutlets on a wire rack over a sheet pan. Reheat for 10 to 12 minutes until heated through and the crust has crisped back up. In an air fryer, reheat at 375°F for 5 to 7 minutes.
Avoid microwaving the chicken cutlets. The microwave steams the breading from the inside, turning a once-crispy crust into a rubbery, soft coating. If you have no other option, use the microwave at 50% power and accept that the texture will suffer.
Freezing the Chicken Cutlets
Fried chicken cutlets freeze well. Allow them to cool completely, then freeze in a single layer on a parchment-lined sheet pan until solid. Transfer to a zip-top freezer bag. Freeze for up to 2 months. Reheat directly from frozen in a 400°F oven for 18 to 22 minutes on a wire rack.
What to Serve With a Chicken Caesar Sandwich
A chicken Caesar sandwich is a complete meal on its own, but the right side dish elevates the entire experience without competing with the sandwich’s flavors.
Classic Side Pairings
- Crispy seasoned waffle fries — the most popular pairing for a chicken Caesar sandwich because the saltiness and crunch complement the creamy Caesar dressing
- Coleslaw — a vinegar-based coleslaw provides brightness and acidity that cuts through the richness of the fried chicken and Parmesan
- Pickles — a simple bowl of dill pickles or bread-and-butter pickles on the side adds the sharp, fermented note that the sandwich benefits from
- Tomato soup — for a colder day, a bowl of roasted tomato soup alongside a chicken Caesar sandwich is a satisfying comfort meal
Lighter Accompaniments
- Simple green salad with lemon vinaigrette
- Roasted cherry tomatoes with fresh basil
- Sliced seasonal fruit — the natural sweetness of watermelon, grapes, or strawberries balances the savory, salty profile of the sandwich
- Corn on the cob with compound butter
Drinks That Work Well
A cold sparkling water with lemon, an iced tea, or a light lager beer all pair cleanly with a chicken Caesar sandwich. The carbonation and mild bitterness in each option cut through the richness of the Parmesan crust and Caesar dressing without overwhelming the food.
Nutrition Estimate Per Serving
Based on 4 servings using the exact quantities listed. Estimates only — actual values will vary depending on specific brands used, frying oil absorption, and bun size.
| Nutrient | Amount Per Serving |
| Calories | 680 kcal |
| Total Fat | 32g |
| Saturated Fat | 8g |
| Cholesterol | 145mg |
| Sodium | 920mg |
| Total Carbohydrates | 52g |
| Dietary Fiber | 3g |
| Total Sugars | 4g |
| Protein | 47g |
| Calcium | 280mg |
| Iron | 4mg |
Note: Switching from pan-frying to baking or air frying reduces the fat content significantly — estimated fat per serving drops to approximately 18g when baked.
Frequently Asked Questions About Chicken Caesar Sandwiches
What makes a good chicken Caesar sandwich?
A great chicken Caesar sandwich has three non-negotiable elements: a genuinely crispy chicken cutlet, cold and crunchy romaine lettuce, and a Caesar dressing that is actually flavorful rather than thin and bland. The Parmesan must appear in at least two places — in the crust and as a topping. The bun needs to be toasted so it does not collapse. Get those five things right and you have an excellent chicken Caesar sandwich.
Can I make the chicken ahead of time?
Yes. Fry the chicken cutlets up to 3 days ahead and store them in the refrigerator. Reheat in a 400°F oven on a wire rack for 10 to 12 minutes before assembling. The crust will not be quite as crispy as fresh-fried, but it will be significantly better than a reheated sandwich assembled in advance. Never store an assembled chicken Caesar sandwich — always keep the components separate.
What is the best Caesar dressing for a chicken Caesar sandwich?
A Caesar dressing with a strong anchovy and Parmesan backbone works best in a chicken Caesar sandwich. Look for dressings where anchovy, Parmesan, and egg yolk or lemon appear early in the ingredient list. Ken’s Steakhouse Caesar, Cardini’s Original, and Primal Kitchen Caesar are consistent performers. For homemade Caesar dressing, combine 2 cloves of minced garlic, 2 anchovy fillets, 1 tablespoon Dijon mustard, 2 tablespoons lemon juice, 1/2 cup mayonnaise, 1/4 cup grated Parmesan, and black pepper. Whisk until smooth.
Can I use chicken thighs instead of chicken breasts?
Absolutely. Boneless, skinless chicken thighs work very well in a chicken Caesar sandwich and are harder to overcook than chicken breasts. They have more natural fat, which keeps the meat juicy even if you cook them a degree or two past the ideal temperature. Pound them to an even 1/2-inch thickness before breading and fry using the same method and timing.
Why is my breading falling off the chicken?
Breading falls off chicken for two main reasons: insufficient dredging and oil that is too cold. Make sure each cutlet is properly patted dry before breading, pressed firmly into the breadcrumb mixture, and allowed to rest for 5 minutes before entering the oil. If the oil is below 325°F when the chicken goes in, the breading absorbs oil before it sets and slides off. Verify oil temperature before each batch.
How do I keep a chicken Caesar sandwich crispy after assembly?
The honest answer is that you cannot fully maintain crispiness in an assembled chicken Caesar sandwich for more than about 10 minutes. The key is minimizing moisture transfer: toast the bun, apply Caesar dressing as close to serving time as possible, and place the lettuce on top of the hot chicken rather than between the chicken and the bun. If you are making sandwiches for a group, keep the chicken on a wire rack in a 200°F oven and assemble to order.
Is a chicken Caesar sandwich healthy?
A fried chicken Caesar sandwich prepared this way comes in at approximately 680 calories per serving with 47 grams of protein — that is a meaningful amount of protein for the calorie count. The sodium is on the higher side at around 920mg, primarily from the Caesar dressing and Parmesan. Baking or air frying the chicken instead of pan-frying reduces fat significantly. Using a lighter bun and reducing the Caesar dressing to one tablespoon per sandwich brings the calorie count down to approximately 520 calories with similar protein.
What bread works best for a chicken Caesar sandwich?
Brioche buns are the top choice because their slight richness and soft interior pair beautifully with the salty, savory filling without competing with it. Potato rolls are a close second — soft, sturdy, and slightly sweet. Avoid very airy rolls that compress into nothing under the weight of the chicken, and avoid sourdough or artisan breads with an extremely hard crust that makes the sandwich difficult to bite through. Ciabatta works if lightly toasted, but the open crumb structure tends to absorb Caesar dressing very quickly.
For more easy and delicious chicken recipes, explore our collection.
Final Thoughts on This Chicken Caesar Sandwich
A chicken Caesar sandwich is one of those recipes that rewards attention to detail at every step. The chicken must be dry before breading. The oil must be at the right temperature. The buns must be toasted. The dressing must be cold. The sandwich must be eaten immediately after assembly.
None of these steps are difficult. They are small habits that separate a forgettable chicken Caesar sandwich from one that people ask you to make again. Follow this recipe once and you will understand exactly what each step contributes to the final result.
Once you have made the base recipe, experiment with the variations. The spicy version with cayenne and hot honey, the air fryer version for weeknight convenience, the grilled version for summer — each one has its place. But start with the fried original. It is the standard against which every other version is measured.
If you make this chicken Caesar sandwich, leave a note in the comments with any tweaks you made. And if you are looking for more ways to elevate everyday sandwich recipes, explore the related guides below.
Follow me on Pinterest for more delicious recipes.