Thick and Chewy Brown Butter Chocolate Chip Cookies (Nutty, Rich, Irresistible)
If you want the best chocolate chip cookies you have ever made — thick, chewy, with golden caramelized edges, pools of melted chocolate, and a deep, nutty, almost toffee-like flavor that plain melted butter cookies simply cannot achieve — this is the recipe. The secret is brown butter. Five minutes at the stove transforming ordinary salted butter into a golden, nutty, aromatic liquid that changes the entire flavor profile of the finished cookie from good to genuinely extraordinary.
For more easy and delicious Dessert, explore our collection.
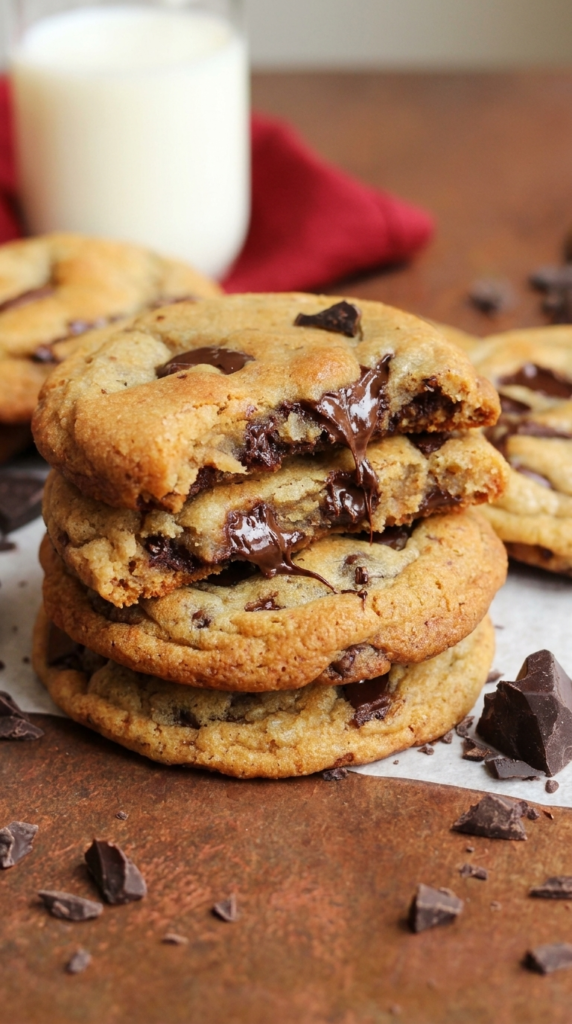
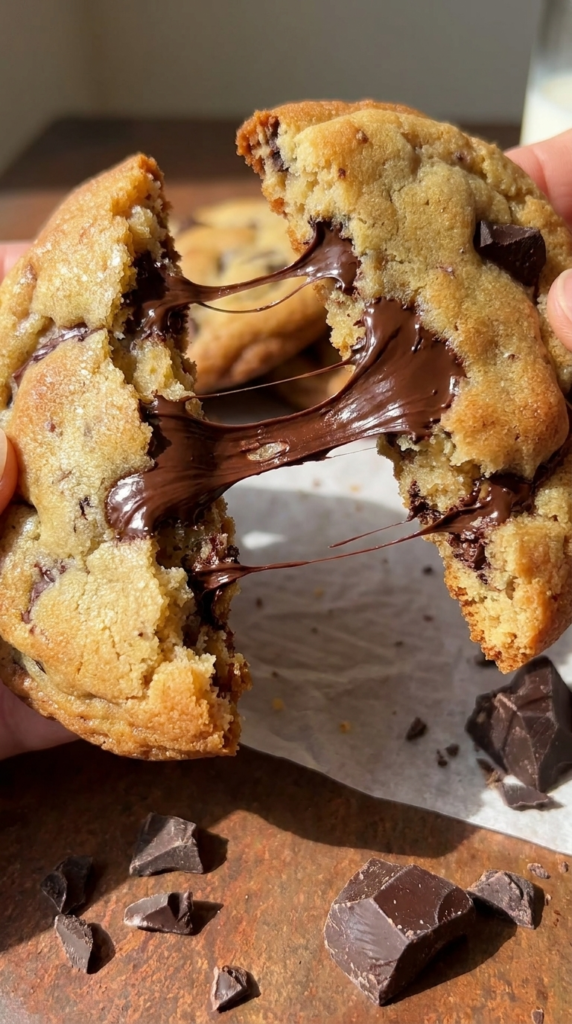
These thick and chewy brown butter chocolate chip cookies deliver the perfect texture combination that every cookie lover chases — crispy at the very edge, chewy and dense through the center, and slightly underdone at the very middle so they finish setting on the pan after baking. The combination of white and brown sugar produces both the caramelized crunch at the edges and the moisture retention that keeps the centers chewy for days. The single egg with a splash of milk is the precise moisture formula for thick, chewy, non-cakey cookies.
Brown butter is not a difficult technique. It is a five-minute process that requires only your full attention and a willingness to not walk away from the stove. Master it once and you will brown butter for every batch of chocolate chip cookies you ever make again.
Follow me on Pinterest for more delicious recipes.
Why These Brown Butter Chocolate Chip Cookies Work
Every ingredient and technique decision in this recipe is producing a specific, intentional result.
Brown butter is the flavor multiplier that changes everything. Browning butter is not just about the color — it is a chemical transformation. As butter heats past its smoke point, the water evaporates and the milk solids undergo the Maillard reaction, developing hundreds of new flavor compounds including pyrazines and furanones that produce the characteristic nutty, caramel, and toasted hazelnut aroma. These flavor compounds are absorbed completely into the cookie dough during mixing and infuse every bite of the finished thick and chewy brown butter chocolate chip cookies with a depth and complexity that no amount of vanilla extract or extra chocolate can replicate. The flavor difference between a standard butter chocolate chip cookie and a brown butter chocolate chip cookie is immediately noticeable to everyone who tastes them side by side.
Salted butter enhances the brown butter flavor specifically. The recipe uses salted butter rather than unsalted for a deliberate reason — the salt in the butter is distributed through the fat during browning and becomes embedded in the browned milk solid compounds that develop at the bottom of the pan. This produces a more complex, more deeply enhanced nutty-savory flavor in the brown butter itself compared to unsalted butter browned the same way. If using unsalted, the added salt goes into the dough separately and does not interact with the browning process in the same way.
Milk replaces the moisture lost during browning. When butter browns, the water content (approximately 15 to 20% of butter is water) evaporates completely. If that moisture is not replaced in the dough, the finished cookies will be drier and more crumbly than expected for a chocolate chip cookie recipe that uses a full stick of butter. Adding milk to the dough compensates precisely for this lost moisture, restoring the hydration level the dough needs to produce thick, chewy brown butter chocolate chip cookies rather than dry, snappy ones.
White sugar plus light brown sugar — the two-sugar system. White granulated sugar does two things in cookie baking: it caramelizes at the edges of the cookie during baking (producing the characteristic golden, slightly crunchy edge of the best thick and chewy brown butter chocolate chip cookies), and it produces a spreading behavior that creates the classic round, flat-edged shape. Light brown sugar is used specifically over dark brown sugar because its lower molasses content allows the brown butter flavor to be the dominant flavor note rather than being overpowered by the strong molasses character of dark brown sugar. The combination of both sugars produces the ideal balance of crispy edges, chewy centers, and complementary sweetness.
One whole egg, not two. One egg is precisely the moisture and protein the dough needs for thick, chewy cookies. A second egg would add protein that produces a cakier, airier texture — exactly the texture these cookies are specifically formulated to avoid. One egg produces the dense, chewy, substantial texture that makes thick and chewy brown butter chocolate chip cookies so satisfying.
Chilling the dough after mixing. Chilling rested brown butter cookie dough before baking produces several simultaneous improvements: it firms the butter so cookies spread less and stay thicker during baking, it allows the flour to fully hydrate for a more cohesive dough, and it deepens the flavor as the brown butter compounds continue to develop in the sugars. Even 30 minutes of chilling produces noticeably thicker, more flavorful thick and chewy brown butter chocolate chip cookies than baking immediately.
Ingredients
For the brown butter:
- 1 cup (2 sticks, 226g) salted butter (or unsalted — see notes)
For the cookie dough:
- 3/4 cup (150g) granulated white sugar
- 3/4 cup (165g) light brown sugar, packed
- 1 large egg, room temperature
- 2 tbsp milk
- 2 tsp pure vanilla extract
- 2 1/4 cups (280g) all-purpose flour
- 1 tsp baking soda
- 1/4 tsp salt (increase to 1/2 tsp if using unsalted butter)
- 2 cups (340g) chocolate chips (semi-sweet or a combination of semi-sweet and dark)
Optional but recommended:
- Flaky sea salt for finishing (Maldon or fleur de sel)
Key Ingredient Notes
Salted vs unsalted butter. Salted butter produces a more complex, more enhanced brown butter flavor because the salt is integrated into the fat during the browning process. If using unsalted butter, double the added salt in the dough to 1/2 teaspoon — this compensates for the missing salt but does not replicate the integrated salted-butter browning experience. Either produces excellent thick and chewy brown butter chocolate chip cookies. Salted is the preferred choice.
Light brown sugar specifically. Dark brown sugar contains approximately twice the molasses of light brown sugar and produces a stronger, more assertive flavor that competes with and partially masks the brown butter. Light brown sugar provides the chewy texture-contributing moisture and a mild caramel sweetness that supports rather than overshadows the brown butter. Do not substitute dark brown sugar without expecting a noticeably different flavor profile.
Room temperature egg. A cold egg from the refrigerator does not incorporate as smoothly into the brown butter and sugar mixture, and can cause the brown butter to seize slightly into small, uneven clumps rather than mixing into a smooth emulsified dough. Set the egg out at room temperature for 15 minutes before using, or place it in a bowl of warm water for 5 minutes.
Milk — any fat percentage. The two tablespoons of milk is used purely to restore the moisture lost during the browning process. Whole milk, 2%, oat milk, and almond milk all work identically in this small quantity — the difference in fat content across 2 tablespoons is negligible. Use whatever you have.
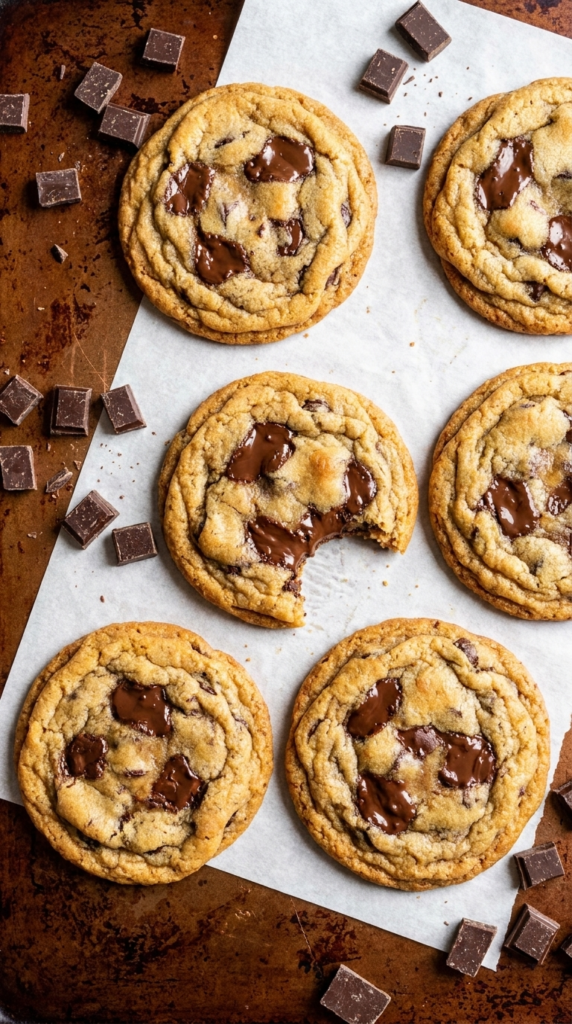
Chocolate chips — quality and type. The brown butter flavor in these cookies is complex and deserves an equally complex chocolate. Semi-sweet chips (60% cacao) provide the classic, universally appealing sweetness balance. A combination of semi-sweet and dark chocolate chips (72% cacao) produces the most nuanced flavor in thick and chewy brown butter chocolate chip cookies — the dark chocolate’s bitterness contrasts beautifully with the sweet nutty brown butter notes. Chopped chocolate bars rather than chips produce irregular, dramatic pools of melted chocolate that are visually stunning and texturally superior to uniform chips.
Flaky sea salt finishing. A pinch of Maldon or fleur de sel pressed onto each ball of dough immediately before baking produces visible salt flakes on the finished cookies that provide micro-bursts of salt contrast against the sweet brown butter dough and the melted chocolate. This is the single optional ingredient that most dramatically elevates the finished presentation and flavor of thick and chewy brown butter chocolate chip cookies.
All-purpose flour — measured correctly. The flour amount in cookie recipes is particularly sensitive to measurement method. Always measure flour by spooning it into the measuring cup and leveling off the top — never by scooping directly from the bag, which packs the flour and can add 20 to 30% more than intended. Packed flour produces stiff, dry, cakey thick and chewy brown butter chocolate chip cookies rather than the tender, chewy result this recipe is designed for. A kitchen scale (280g) is the most accurate method.
💡 For the most dramatic thick and chewy result, use the dough-ball-pressing technique immediately after shaping: after rolling each ball, press 3 to 4 extra chocolate chips into the top surface before chilling. The chips pressed on top produce the Instagram-worthy, visually loaded appearance of bakery-style thick and chewy brown butter chocolate chip cookies and create more melted chocolate surface area on the finished cookie.
Required Equipment
- Small saucepan (for browning butter)
- Heatproof bowl (to receive the hot brown butter)
- Large mixing bowl or stand mixer
- Hand mixer or stand mixer with paddle attachment
- Cookie scoop or tablespoon
- Baking sheets
- Parchment paper or silicone baking mats
- Wire cooling rack
- Kitchen scale (recommended for flour measurement)
How to Brown Butter — Step by Step
Browning butter is the most important technique in this recipe and the one that requires the most attention. Read through the entire process before starting.
- Cut the butter into uniform pieces. Cut the butter into tablespoon-sized pieces before adding to the saucepan. Uniform pieces melt at the same rate and produce more even browning than large irregular chunks.
- Melt over medium heat in a light-colored saucepan. A light-colored or stainless steel saucepan allows you to see the color of the milk solids developing at the bottom of the pan. Dark nonstick pans make it nearly impossible to judge when the butter has reached the correct golden-brown color and you are more likely to burn it.
- Stir constantly as the butter melts. Once melted, the butter will begin to simmer and crackle as the water content boils off. Stir continuously — this distributes the heat evenly and prevents any area of the butter from browning faster than others.
- Watch for the foam stage. As the water evaporates, the butter will begin to foam at the surface. This is when the Maillard reaction begins in the milk solids beneath the foam. Do not leave the stove at any point from this moment forward. The butter can go from perfectly browned to burned in under 30 seconds.
- Watch for the golden flecks through the dense foam. The foam will become very thick and you will not be able to see the clear butterfat beneath it. The foam itself will begin to turn golden. As you stir, you will see small brown flecks rising through the foam from the bottom of the pan — these are the browned milk solids. This is the sign that you are done.
- Remove from heat and pour immediately. The moment you see golden foam and smell the toasted nutty aroma, remove the pan from the heat and immediately pour the brown butter into a clean heatproof bowl. The residual heat of the pan will continue cooking the butter if you leave it — seconds matter between perfectly browned and burned.
- Cool completely before using. Allow the brown butter to cool to room temperature — approximately 20 to 30 minutes at room temperature or 10 minutes in the refrigerator until it looks opaque and slightly solidified around the edges. Using hot brown butter in the dough partially cooks the egg and produces a greasy, broken dough rather than a cohesive one.
Step-by-Step Instructions for Thick and Chewy Brown Butter Chocolate Chip Cookies
- Brown the butter and cool. Follow the brown butter instructions above. Pour into a heatproof bowl and allow to cool completely — approximately 20 to 30 minutes at room temperature. The butter should look golden-brown with visible browned bits at the bottom of the bowl. Do not discard those bits — they contain the most concentrated flavor.
- Mix the brown butter and sugars. Add both the granulated white sugar and the light brown sugar to the cooled brown butter. Using a hand mixer or stand mixer with the paddle attachment, beat on medium speed for 2 to 3 minutes until the mixture is smooth, slightly fluffy, and the sugars are completely incorporated into the butter. This step begins the aeration process and ensures the sugars dissolve evenly into the fat for consistent sweetness throughout the thick and chewy brown butter chocolate chip cookies.
- Add the egg, milk, and vanilla. Add the room-temperature egg, 2 tablespoons of milk, and vanilla extract to the butter and sugar mixture. Beat on medium speed for 1 to 2 minutes until fully incorporated and the mixture looks smooth and glossy — slightly paler than the butter-sugar mixture alone.
- Add the dry ingredients. In a separate bowl, whisk together the flour, baking soda, and salt. Add the dry mixture to the wet mixture and mix on low speed just until no visible flour streaks remain — do not overmix. Overmixing develops gluten and produces tough, dense cookies rather than tender, chewy ones. Stop as soon as the flour is incorporated.
- Fold in the chocolate chips. Add the chocolate chips and fold in with a silicone spatula by hand — not the mixer. Hand-folding prevents the chips from breaking and ensures they stay distributed throughout rather than collecting at the bottom of the bowl.
- Chill the dough. Cover the bowl with plastic wrap and refrigerate for a minimum of 30 minutes. One hour produces better results. Overnight produces the best results — the flavor of the brown butter deepens significantly during an extended chill and the texture improves noticeably. Do not skip chilling — it is the step most responsible for the thick part of thick and chewy brown butter chocolate chip cookies.
- Preheat the oven to 375°F. While the oven preheats, line two baking sheets with parchment paper or silicone baking mats.
- Portion the dough. Using a cookie scoop or two tablespoons, portion the chilled dough into balls of approximately 2 tablespoons each. Roll each portion briefly between your palms to form a smooth ball. For extra visual appeal, press 3 to 5 additional chocolate chips into the top of each ball.
- Optional: add flaky salt. Press a pinch of flaky sea salt onto the top of each dough ball immediately before the baking sheet goes in the oven.
- Bake at 375°F for 10 to 12 minutes. Place the baking sheet on the center rack and bake for 10 to 12 minutes until the edges are set and golden and the center looks slightly underdone and still shiny. The center will continue to firm up from residual heat after the pan is removed. Pulling the cookies when the center still looks slightly underdone is the most important timing decision in producing chewy thick and chewy brown butter chocolate chip cookies — fully set centers in the oven produce hard, dry cookies at room temperature. The cookies should look golden at the edges with a pale, barely-set center — that is correct.
- Rest on the pan for 5 minutes. Leave the cookies on the hot baking sheet for 5 minutes after removing from the oven. The residual heat from the pan continues cooking the center of each cookie to the perfect chewy-set consistency. Removing the cookies to the wire rack immediately produces under-set centers that are too soft and do not hold their shape.
- Transfer to a wire rack. After 5 minutes, transfer the cookies to a wire cooling rack and allow to cool for at least 10 minutes before eating — the full chewy texture develops as the cookies cool and the chocolate sets slightly.
For more easy and delicious Dessert, explore our collection.
Pro Tips for the Best Thick and Chewy Brown Butter Chocolate Chip Cookies
- Never walk away from browning butter. The window between perfectly browned and burned is approximately 30 seconds. From the moment the foam becomes dense and you start seeing golden flecks, give the butter your complete, undivided attention until it is poured into the bowl.
- Include every browned bit from the bottom of the bowl. The dark specks at the bottom of the brown butter bowl are not burned — they are the most concentrated source of the nutty, caramelized flavor compounds. Scrape every bit of brown butter from the pan and bowl into the dough. Leaving any behind reduces the flavor impact of the browning process.
- Chill overnight for the best cookies. Thirty minutes is the minimum chill time. One hour is good. Overnight is exceptional. Extended chilling allows the brown butter flavor to develop further in the sugar matrix, the flour to hydrate completely, and the butter to firm enough that the cookies spread very little and stay dramatically thicker in the oven.
- Bake one sheet at a time on the center rack. Two sheets in the oven simultaneously produce uneven results — the bottom sheet browns faster than the top. One sheet per bake cycle on the center rack produces the most even, most consistent thick and chewy brown butter chocolate chip cookies.
- Use a cookie scoop for uniform size. Uniformly sized dough balls bake at the same rate. Inconsistent sizing produces some cookies that are over-browned while others are under-done on the same baking sheet.
- Bang the baking sheet on the counter immediately after pulling from the oven. Dropping the hot baking sheet firmly onto the counter from about 2 inches of height produces the crinkled, slightly deflated appearance and the chewy, dense-center texture that characterizes bakery-style thick and chewy brown butter chocolate chip cookies. This technique is optional but produces a visually dramatic result.
Common Mistakes to Avoid
- Walking away from the browning butter — This is the only technique failure that cannot be corrected. Burned butter produces an acrid, bitter flavor throughout the entire batch of cookies. Stay at the stove from the moment the butter melts until it is poured into the bowl.
- Adding hot brown butter to the dough — Hot brown butter partially cooks the egg and produces a greasy, broken, unworkable dough. Cool the brown butter completely — it should feel barely warm or room temperature — before mixing with any other ingredients.
- Measuring flour by scooping from the bag — Scooping packs the flour and consistently adds 20 to 30% more than intended, producing dry, cakey, over-dense cookies. Always spoon flour into the measuring cup and level off the top, or use a kitchen scale.
- Skipping the chill — Unchilled brown butter dough produces flatter, thinner cookies that spread extensively during baking and lose the thick characteristic that this recipe is designed to produce. Chill for at minimum 30 minutes.
- Overbaking — The most common cause of hard, dry chocolate chip cookies is leaving them in the oven until the center looks fully set. Pull when the center still looks shiny and slightly underdone — the residual heat from the pan finishes the baking during the 5-minute rest.
- Not scraping the browned bits into the bowl — Those dark specks at the bottom of the pan are the entire point of brown butter. Leaving them behind in the pan wastes the most concentrated flavor compounds in the process.
Variations
Brown butter chocolate chunk cookies
Chop two 4-oz chocolate bars (one semi-sweet, one dark) into rough chunks rather than using chips. The irregular shapes produce dramatic, varied pools of melted chocolate throughout each cookie and create the visual impact associated with high-end bakery thick and chewy brown butter chocolate chip cookies.
Brown butter walnut chocolate chip cookies
Add 1 cup of roughly chopped toasted walnuts to the dough alongside the chocolate chips. Toasted walnuts add earthy, bitter notes that complement the brown butter and dark chocolate brilliantly.
Brown butter M&M cookies
Replace half the chocolate chips with M&Ms for a colorful, visually vibrant variation that is particularly popular with children. The candy shell cracks during baking and produces a different textural experience than chips.
Brown butter espresso chocolate chip cookies
Add 1 tablespoon of instant espresso powder dissolved in the milk before adding to the dough. The espresso amplifies both the chocolate and the brown butter flavors significantly without producing a coffee-forward taste in the finished cookie.
Brown butter toffee chocolate chip cookies
Replace 1/2 cup of the chocolate chips with the same quantity of toffee bits (Heath Bar bits). The toffee melts partially during baking and adds a buttery caramel crunch that pairs exceptionally well with the brown butter.
Storage
Room temperature
Store cooled thick and chewy brown butter chocolate chip cookies in an airtight container at room temperature for up to 5 days. The chewy texture is maintained best when a slice of bread is placed in the container alongside the cookies — the bread releases moisture that keeps the cookies soft.
Freezer — baked cookies
Freeze baked and completely cooled cookies in a single layer until solid, then transfer to a freezer bag for up to 3 months. Thaw at room temperature for 20 to 30 minutes. The brown butter flavor actually becomes more pronounced after freezing and thawing.
Freezer — raw dough balls
Portion the chilled dough into balls, place on a parchment-lined baking sheet, and freeze until solid. Transfer to a freezer bag for up to 3 months. Bake from frozen at 375°F adding 2 to 3 minutes to the bake time. This is the best long-term storage method — fresh-baked thick and chewy brown butter chocolate chip cookies available at any time with no thawing required.
Frequently Asked Questions
— Why brown the butter for chocolate chip cookies?
Browning butter produces hundreds of new flavor compounds through the Maillard reaction of the milk solids under heat — nutty, caramelized, toffee-like, toasted hazelnut notes that are completely absent from unbrowned butter. These compounds infuse every bite of the thick and chewy brown butter chocolate chip cookies with a depth and complexity that makes them taste significantly more interesting and more sophisticated than standard chocolate chip cookies. It is a five-minute process with a dramatic, immediately noticeable impact on flavor.
— Why did my brown butter burn?
Brown butter burns when left unattended past the point of the golden foam and the first appearance of browned flecks. The moment you see golden foam and smell the nutty aroma, pour it immediately into the waiting bowl — every additional second on the heat darkens the milk solids further toward bitterness. If your butter smells acrid rather than nutty and the solids look dark brown to black rather than golden amber, it has burned and should be discarded.
— Why are my cookies flat instead of thick?
The most common causes are insufficient chilling (less than 30 minutes), butter that was too warm when mixed into the dough, or too little flour from incorrect measurement. Chill for a minimum of 30 minutes (overnight for best results), ensure the brown butter is completely cool before mixing, and measure flour by spooning into the cup rather than scooping.
— Can I use dark brown sugar instead of light brown sugar?
Yes — but the flavor changes noticeably. Dark brown sugar has twice the molasses content of light brown sugar and produces a stronger, more assertive molasses flavor that can partially mask the brown butter notes. Light brown sugar is specifically chosen to let the brown butter flavor lead. Dark brown sugar produces a good cookie but a different cookie.
— How do I know when to pull the cookies from the oven?
Pull the thick and chewy brown butter chocolate chip cookies when the edges look set and golden and the center still looks shiny and slightly underdone — as if they need one or two more minutes. The center firms to the perfect chewy consistency during the 5-minute rest on the hot pan. Cookies that look fully set in the oven will be hard and over-baked at room temperature.
— Can I make the dough ahead of time?
Yes — the dough can be refrigerated for up to 72 hours before baking. Longer chilling produces progressively more developed flavor as the brown butter compounds continue to react with the sugars. Many bakers specifically make the dough 24 to 48 hours ahead for the deepest flavor in their thick and chewy brown butter chocolate chip cookies.
— Why does my dough look greasy after mixing?
Greasy-looking dough is almost always caused by mixing hot or warm brown butter rather than completely cooled brown butter. Hot fat does not emulsify properly with the egg and produces a separated, greasy dough. If this happens, refrigerate the dough for 20 to 30 minutes and then re-mix — the cold temperature usually allows the emulsion to come back together.
You Might Also Like
🔗https://www.recipesbyelowen.com/category/dessert/ — a bold savory recipe from Recipebyelowen when you want something completely different
🔗 For more easy and delicious Dessert, explore our collection.
— a classic comfort food dinner with minimal ingredients
Conclusion
Thick and chewy brown butter chocolate chip cookies are the chocolate chip cookie recipe you make once and never go back from. The brown butter takes five minutes and completely transforms the flavor of a cookie you thought you already knew how to make. The chilling produces the thickness. The two-sugar system produces the chew. The flaky salt finish produces the contrast that makes every bite complete.
Make them once and they become your permanent chocolate chip cookie recipe. Rate them below and share your favorite variation or mix-in in the comments.
Print
Thick and Chewy Brown Butter Chocolate Chip Cookies (Nutty, Rich, Irresistible)
- Prep Time: 15 min
- Cook Time: 11 minutes
- Total Time: 1 HOUR
- Category: Dessert, Cookies
- Cuisine: American
Description
The best thick and chewy brown butter chocolate chip cookies — deeply nutty, caramelized brown butter dough with white and light brown sugar, one egg, a splash of milk, and loads of chocolate chips, chilled and baked at 375°F for the chewiest, most flavorful chocolate chip cookies you have ever made. A five-minute brown butter technique that changes every cookie you bake forever.
Ingredients
- 1 cup (226g) salted butter (or unsalted — double the added salt to 1/2 tsp if using unsalted)
- 3/4 cup (150g) granulated white sugar
- 3/4 cup (165g) light brown sugar, packed
- 1 large egg, room temperature
- 2 tbsp milk
- 2 tsp pure vanilla extract
- 2 1/4 cups (280g) all-purpose flour, spooned and leveled
- 1 tsp baking soda
- 1/4 tsp salt (1/2 tsp if using unsalted butter)
- 2 cups (340g) semi-sweet or dark chocolate chips
- Flaky sea salt for finishing (optional but recommended)
Instructions
- Brown the butter: melt butter in a light-colored saucepan over medium heat, stirring constantly. Continue cooking through the crackling, foaming, and dense foam stages. When golden foam appears and you smell a nutty toasted aroma with small browned flecks visible, immediately pour into a heatproof bowl. Cool completely — 20 to 30 minutes.
- Beat cooled brown butter with both sugars on medium speed for 2 to 3 minutes until smooth and incorporated.
- Add room-temperature egg, milk, and vanilla. Beat until smooth and glossy, 1 to 2 minutes.
- Whisk flour, baking soda, and salt in a separate bowl. Add to wet mixture and mix on low just until no flour streaks remain. Do not overmix.
- Fold in chocolate chips by hand with a spatula.
- Cover dough and refrigerate for at least 30 minutes — overnight for best results.
- Preheat oven to 375°F. Line baking sheets with parchment paper.
- Scoop dough into 2-tablespoon balls. Press extra chips into the tops. Add flaky salt if using.
- Bake one sheet at a time on the center rack for 10 to 12 minutes until edges are golden and centers still look slightly underdone and shiny.
- Rest on the hot baking sheet for 5 minutes before transferring to a wire rack.
Notes
- Never walk away from browning butter — it goes from perfect to burned in under 30 seconds.
- Cool the brown butter completely before mixing — hot butter partially cooks the egg and breaks the dough.
- Include every browned bit from the bottom of the bowl — those are the most flavorful compounds.
- Measure flour by spooning into the cup, not scooping — packed flour produces dry, cakey cookies.
- Chill for minimum 30 minutes — overnight produces the best flavor and thickest cookies.
- Pull from the oven when the center still looks slightly underdone — it sets during the 5-minute pan rest.
- For unsalted butter, double the salt to 1/2 tsp in the dough.
- Dough balls can be frozen for up to 3 months — bake from frozen adding 2 to 3 extra minutes.
- Baked cookies keep at room temperature in an airtight container for up to 5 days.
For more easy and delicious Dessert, explore our collection.