Amazing Oreo Balls Recipes: Delicious Results Every Time
Craving something sweet that’s both easy to make and a crowd-pleaser? These Oreo Balls are the answer! Combining crunchy, chocolatey Oreos with creamy cream cheese and coated in decadent chocolate, this no-bake treat is perfect for events or just because you deserve a delicious dessert. The best part? This simple recipe requires just three main ingredients, making it a quick and satisfying solution for unexpected guests or a sweet craving.
For more easy and delicious Dessert, explore our collection.
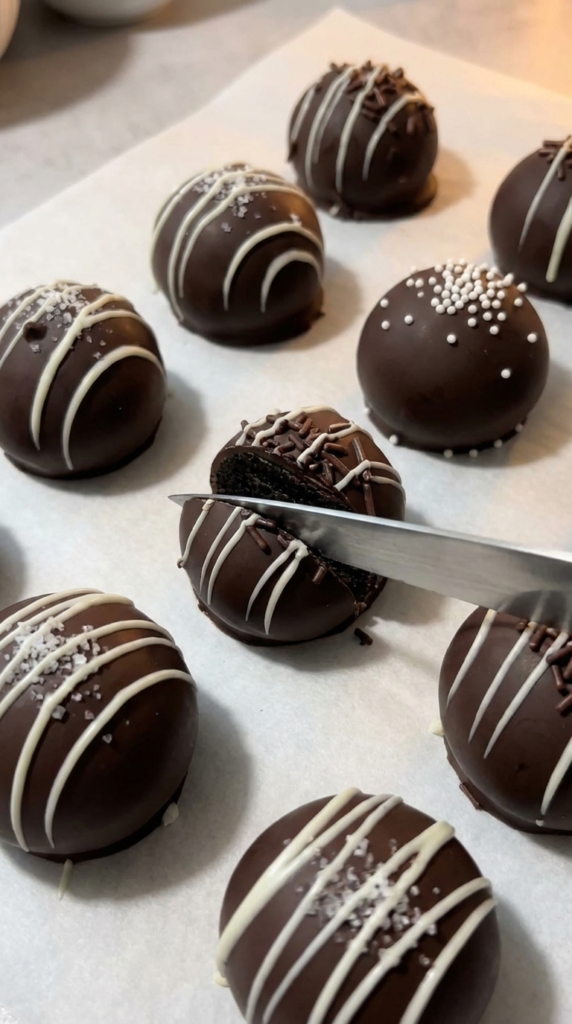
Imagine biting into a rich chocolate-coated ball that has the delightful crunch of Oreos, all while being melt-in-your-mouth creamy on the inside. With minimal preparation, you can impress your family and friends with treats that look sophisticated but are incredibly simple to whip up. In this recipe, you’ll learn how to make Oreo Balls that are perfectly balanced in flavor and texture, ensuring they turn out tasty every time!
Why This Recipe Works
- Simple Ingredients: The recipe relies on just a few components, making it budget-friendly and easy to find.
- No-Bake Delight: Since these Oreo Balls don’t require any baking, they save time and allow for quick preparation.
- Versatile Flavors: You can customize your Oreo Balls with different types of chocolate or added flavors.
- Impressive Appearance: Coating the balls in chocolate gives them a polished, professional look that’s perfect for any occasion.
- Easily Scalable: You can easily double or triple the recipe for larger gatherings without affecting the quality.
Ingredients for Oreo Balls
To make the perfect Oreo Balls, you’ll need the following ingredients:
Main Ingredients
- 16 Oreos: These provide the core flavor and texture, combining a crunchy outer layer with creamy filling.
- 8 oz cream cheese: Softened cream cheese binds the crushed Oreos together, giving the balls a rich and creamy interior.
- 8 oz chocolate (milk or dark): This is used for coating the balls, adding a luxurious finish that complements the Oreo’s flavor.
Optional Add-Ins
- Sprinkles: Add for decoration and extra texture. They provide a fun visual element that makes your Oreo Balls festive and vibrant.
Required Equipment
- Food Processor: Essential for crushing Oreos into fine crumbs for an even texture.
- Mixing Bowl: Used for combining the crushed Oreos and cream cheese thoroughly.
- Baking Sheet: A flat surface for placing the rolled balls; line it with parchment paper to prevent sticking.
- Microwave-Safe Bowl: Needed for melting chocolate safely without burning.
How to Make Oreo Balls: Step-by-Step
Follow this easy recipe to create scrumptious Oreo Balls in no time!
Crush the Oreos: Start by placing 16 Oreos into a food processor. Pulse until you achieve fine crumbs, resembling sand. This crumb texture is key for forming the balls.
Combine Ingredients: In a mixing bowl, add the crushed Oreos and 8 oz of softened cream cheese. Blend until the mixture is well combined and forms a moldable dough. The cream cheese adds richness and helps bind the Oreo crumbs together.
Shape the Balls: Roll the Oreo mixture into small, uniform balls, about 1 inch in diameter. Aim for consistency in size for even coating and presentation. Place these on a baking sheet lined with parchment paper.
Chill the Balls: Transfer the baking sheet to the freezer and let the balls chill for about 30 minutes. This helps them firm up, making them easier to dip in chocolate.
Melt the Chocolate: In a microwave-safe bowl, microwave 8 oz of your chosen chocolate in 30-second intervals, stirring each time until smooth. Be careful not to overheat, as this can cause the chocolate to seize.
Dip the Balls: Remove the chilled Oreo balls from the freezer. Using a fork, dip each ball into the melted chocolate, ensuring they’re thoroughly coated. Let the excess chocolate drip off.
Decorate: Place the dipped Oreo balls back onto the baking sheet. If desired, sprinkle with colorful sprinkles before the chocolate sets. This step adds a fun touch and can be tailored to your event.
Set the Chocolate: Transfer the baking sheet back to the refrigerator for about 30 minutes, or until the chocolate has completely hardened. This will ensure your Oreo Balls maintain their shape and snap!
Chef Tips for the Perfect Oreo Balls
Use Room Temperature Cream Cheese: Ensure your cream cheese is well softened, as this results in a smoother blend with the Oreo crumbs and prevents a lumpy texture.
Optimal Crumb Size: Crush Oreos into fine crumbs rather than coarse bits; this will allow the mixture to bind well and create a consistent shape.
Chilling is Key: Don’t skip the chilling step before dipping. This helps your Oreo Balls maintain their shape during the chocolate coating process.
Choose Your Chocolate Wisely: Use high-quality chocolate for the coating. Dark chocolate adds a richer flavor, while milk chocolate is sweeter. Consider mixing both for a balance.
Experiment with Flavors: Feel free to add flavors like peppermint extract or espresso powder for unique twists. Just be cautious with the amount to avoid overpowering the Oreo’s flavor.
Common Mistakes to Avoid
Not Chilling the Mixture: Mistake: Skipping the chilling step can lead to balls falling apart when dipped. Solution: Always chill the mixture for at least 30 minutes before rolling.
Overheating the Chocolate: Mistake: Heating chocolate too long can cause it to seize and become un-dippable. Solution: Microwave in short intervals and stir frequently for a smooth melt.
Incorrect Oreos Crush: Mistake: Leaving large pieces of Oreos can create an uneven texture in the balls. Solution: Make sure the crumbs are finely crushed for best results.
Not Using Parchment Paper: Mistake: Placing the raw balls directly on the baking sheet can lead to sticking. Solution: Always line your baking sheet with parchment for easy removal.
Too Warm Environment: Mistake: Working in a warm kitchen can cause the cream cheese and chocolate to soften too much. Solution: Keep your workspace cool, or chill the mixture longer.
For more easy and delicious Dessert, explore our collection.

Variations & Substitutions
Dietary Swaps:
- Gluten-Free: Use gluten-free Oreos to cater to dietary restrictions.
- Dairy-Free: Substitute cream cheese with dairy-free cream cheese options for a vegan variant.
- Low-Carb: Replace Oreos with almond flour-based cookies suitable for ketogenic diets.
Ingredient Options:
- Flavor Additions: Incorporate flavored extracts like vanilla or almond to enhance depth.
- Chocolate Type: Experiment with white chocolate for a sweeter coating or dark chocolate for a more robust taste.
- Nut Coatings: Consider rolling in crushed nuts or coconut for added texture and flavor.
Regional Variants:
- Peanut Butter Variation: Try mixing in peanut butter with the cream cheese for a PB Oreo version!
- Mint Variation: Add peppermint extract to the cream cheese mixture for a refreshing mint chocolate treat.
Storage & Reheating
Fridge: Oreo Balls can be stored in an airtight container in the refrigerator for up to one week. Keep them separated with parchment paper to avoid sticking.
Freezer: For longer storage, freeze the Oreo Balls in a single layer in an airtight container or freezer bag. They can last up to three months. Allow to thaw in the fridge when ready to enjoy.
Reheating: There’s no need to reheat Oreo Balls! Enjoy them straight from the fridge or freezer for that cool, delightful crunch.
What NOT to Do: Avoid leaving Oreo Balls at room temperature for extended periods, as this can cause the chocolate to melt and lose flavor integrity.
Serving Suggestions
- Party Treats: Serve Oreo Balls on a platter as a dessert option at parties or gatherings.
- Holiday Gifts: Package them cute boxes or tins for homemade gifts during the holidays.
- Movie Night Snack: Perfect paired with your favorite films for a sweet night in!
- Tea/Round Table Treats: Offer them alongside coffee or tea during brunch or casual catch-ups.
Plating Tip: Use decorative cupcake liners to give the Oreo Balls an elegant touch when serving.
Nutrition Estimate (per serving)
| Nutrient | Amount per Serving |
|————-|———————|
| Calories | 150 |
| Protein | 2 g |
| Fat | 8 g |
| Carbs | 18 g |
| Fiber | 0 g |
| Sodium | 50 mg |
Values are estimates and may vary based on ingredients used.
Frequently Asked Questions About Oreo Balls
What are Oreo Balls made of?
Oreo Balls are primarily made from crushed Oreos combined with softened cream cheese, then coated in melted chocolate. This combination creates a rich, decadent treat that’s easy to make.
How long can Oreo Balls be stored?
Oreo Balls can be stored in the refrigerator for up to a week or in the freezer for up to three months. For the best texture, enjoy them cold.
Do I have to use cream cheese?
While cream cheese is classic for binding the crumbs, alternatives like vegan cream cheese or even peanut butter can be used for a different flavor profile.
What can I use instead of chocolate for coating?
You can use melting wafers, candy melts, or even yogurt coating for a healthier version. Each will impart a different taste and texture to the finished product.
Can I make Oreo Balls ahead of time?
Absolutely! You can prepare Oreo Balls days in advance and keep them in the fridge or freezer until you’re ready to serve.
Are Oreo Balls gluten-free?
They can be made gluten-free by using gluten-free Oreos along with alternative ingredient swaps for cream cheese.
How do I make my Oreo Balls look more enticing?
Consider rolling your Oreo Balls in crushed nuts, coconut flakes, or adding colorful sprinkles for visual appeal.
Can I customize my Oreo Balls?
Yes! Feel free to explore adding different flavorings or using various types of chocolate to enhance your Oreo Balls to your personal taste.
Follow me on Pinterest for more delicious recipes.
Bringing It All Together
Oreo Balls are the perfect treat for anyone looking for an easy, delicious dessert that can be customized to fit any occasion. Whether for a party, a gift, or a cozy night at home, this recipe guarantees satisfaction with its rich flavors and simple steps.
Start making Oreo Balls today and enjoy the sweet rewards of your culinary efforts. Don’t forget to share your results with us in the comments below—your success is our joy!
Print
Oreo Balls
- Prep Time: 15 minutes
- Cook Time: 30 minutes
- Total Time: 45 minutes
- Yield: 20 servings
- Category: Dessert
- Method: No-Bake
- Cuisine: American
- Diet: Vegetarian
Description
Easy no-bake Oreo Balls made with just three ingredients and coated in chocolate, perfect for parties or sweet cravings.
Ingredients
- 16 Oreos
- 8 oz cream cheese, softened
- 8 oz chocolate (milk or dark)
- Sparklers (optional, for decoration)
Instructions
- Crush the Oreos in a food processor until fine crumbs form.
- Combine the crushed Oreos and softened cream cheese in a mixing bowl until well mixed.
- Shape the mixture into small balls, about 1 inch in diameter, and place on a lined baking sheet.
- Chill the balls in the freezer for about 30 minutes.
- Melt the chocolate in a microwave-safe bowl in 30-second intervals, stirring until smooth.
- Dip each chilled ball into the melted chocolate, letting the excess drip off.
- Decorate with sprinkles if desired, and place back on the baking sheet.
- Set the chocolate by refrigerating for about 30 minutes until hardened.
Notes
Use room temperature cream cheese for a smoother texture and high-quality chocolate for better flavor. Feel free to customize with additional flavors.