Chicken Quesadilla — The Crispy, Melted Recipe That Works Every Single Time
The two most common complaints about homemade chicken quesadilla are a soggy, pale tortilla that never crisps properly, and cheese that slides out rather than melting into the filling. Both problems come from the same source — wrong heat and too much filling.
For more easy and delicious chicken recipes, explore our collection.
This recipe fixes both. Medium-low heat after the chicken is cooked gives the tortilla time to develop a deep golden crispness on both sides without burning. The double-cheese method — cheese on the bottom, filling on top, more cheese over the filling before folding — locks everything together in a cohesive, melted layer that holds even after slicing.
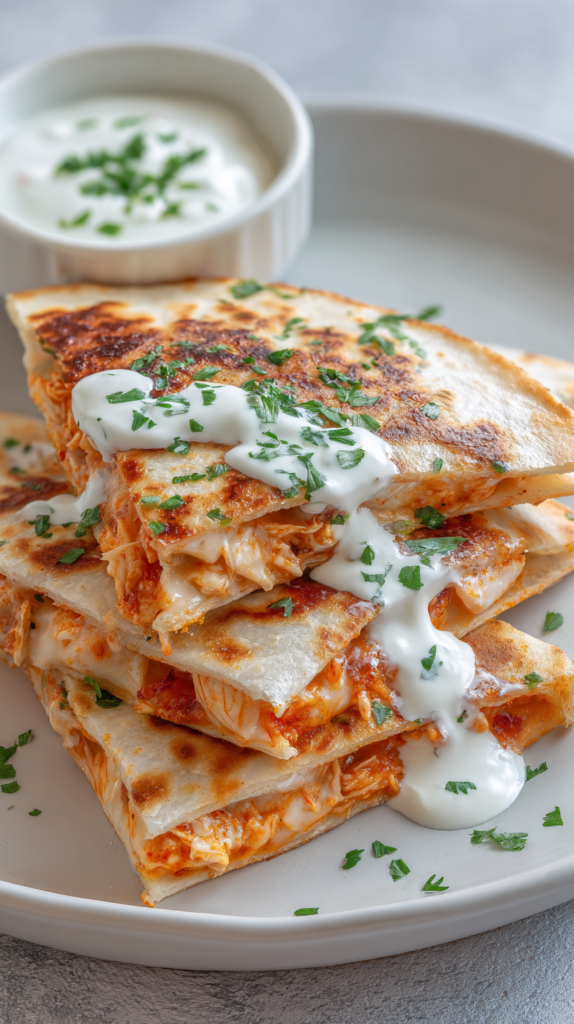
The result is a chicken quesadilla with a genuinely crunchy exterior, completely melted interior, and well-seasoned bite-sized chicken in every wedge.
A chicken quesadilla is a flour tortilla filled with spiced cooked chicken, sautéed bell peppers and onion, and a blend of cheddar and mozzarella cheese, then folded and cooked in a dry or lightly oiled skillet over medium-low heat until both sides are golden and the cheese is completely melted — typically 2 to 3 minutes per side.
The spice blend — chili powder, paprika, garlic powder, cumin, salt, and black pepper — is the difference between a chicken quesadilla that tastes flat and one that tastes like it came from a restaurant. All six spices are added before the chicken goes into the skillet, not after, so they toast into the surface of the meat during cooking.
This chicken quesadilla recipe is ready in 20 minutes and serves four. It is the foundation recipe — the base from which you can build in any direction, from adding black beans and corn to a fully loaded version with jalapeños, sour cream, and salsa.
Cook the seasoned chicken in a skillet over medium heat for 5 to 6 minutes until fully cooked and lightly browned. Remove and set aside. In the same skillet, cook the bell peppers and onion for 2 to 3 minutes until slightly softened. Then assemble each quesadilla over medium-low heat — 2 to 3 minutes per side until the tortilla is deeply golden and the cheese is completely melted through.
Why This Chicken Quesadilla Recipe Works
Each technical decision in this recipe has a specific effect on the finished chicken quesadilla. Understanding why each step matters makes it easy to adapt and troubleshoot.
Medium-Low Heat Produces a Golden Crust Without Burning
Cooking the assembled quesadilla over medium-low heat — lower than the heat used to cook the chicken — gives the cheese inside time to melt completely before the tortilla exterior over-browns. High heat crisps the outside in 60 seconds and burns in 90, leaving the interior cheese still solid. Medium-low heat takes 2 to 3 minutes per side and produces a uniformly golden, crispy tortilla with fully melted cheese throughout.
The Double-Cheese Method Locks in the Filling
Placing cheese on the tortilla first, then the filling, then more cheese on top before folding creates a cheese layer on both the top and bottom of the filling. As both layers melt, they bond the filling between them — preventing the chicken and vegetables from shifting or falling out when the quesadilla is folded, flipped, or sliced into wedges.
Cheddar and Mozzarella Together Beat Either Cheese Alone
Cheddar provides sharp, tangy flavor but melts into a dense, slightly oily layer on its own. Mozzarella melts into a stretchy, smooth, pliable layer but tastes mild. The combination produces a cheese layer that stretches visibly when a quesadilla wedge is pulled apart — the mozzarella providing the stretch and the cheddar providing the flavor.
Seasoning the Chicken Before Cooking Builds Deeper Flavor
Applying all six spices — chili powder, paprika, garlic powder, cumin, salt, and pepper — before the chicken hits the oil-coated skillet means the spices toast directly in the hot pan alongside the chicken surface. This toasting step develops a deeper, more complex flavor than the same spices added after cooking. The finished chicken tastes seasoned throughout, not just on the surface.
Cooking Vegetables Separately Prevents a Soggy Quesadilla
Bell peppers and onion release significant moisture as they cook. Adding them raw directly to the quesadilla filling means all that moisture releases inside the folded tortilla — steaming the crust from the inside and preventing it from crisping. A quick 2 to 3 minute sauté in the same skillet after the chicken drives off most of that moisture before the vegetables go into the quesadilla.
A No-Oil or Minimal-Oil Skillet Crisps the Tortilla Properly
A dry or very lightly oiled skillet — wiped clean after the chicken and vegetables are cooked — is the correct surface for crisping a chicken quesadilla tortilla. Excess oil in the skillet soaks into the tortilla surface, producing a greasy, soft result rather than a clean, dry crisp. The fat already present in the cheese as it melts provides enough internal richness without adding external oil to the pan.
For more easy and delicious chicken recipes, explore our collection.
Ingredients for Chicken Quesadilla
Fourteen ingredients across four categories — chicken, seasoning, cheese, and assembly. Every element in this chicken quesadilla recipe has a specific role.
Chicken and Seasoning
- Boneless skinless chicken breasts2 large
- Olive oil1 tbsp
- Chili powder1 tsp
- Paprika1 tsp
- Garlic powder½ tsp
- Cumin½ tsp
- Salt½ tsp
- Black pepper½ tsp
Cheese and Tortillas
- Shredded cheddar cheese1 cup
- Shredded mozzarella cheese1 cup
- Large flour tortillas (10-inch)4 tortillas
- Sliced bell peppers½ cup
- Diced onion¼ cup
The Spice Blend
Chili Powder1 tsp
Paprika1 tsp
Garlic Powder½ tsp
Cumin½ tsp
Salt½ tsp
Black Pepper½ tsp
Key Ingredient Notes
Chicken Breasts: Cut into small, uniform bite-sized pieces — around ½ to ¾ inch. Uniform size means every piece finishes cooking at the same time, with no dry overcooked pieces mixed with underdone ones. Chicken thighs substitute at the same quantity and weight — they stay slightly juicier and are more forgiving if the skillet runs a little hot.
Cumin: Cumin is the spice that gives this chicken quesadilla its distinctly Mexican-inspired character. It has a warm, slightly earthy, smoky note that none of the other five spices replicate. Do not reduce or omit it — cumin is to a chicken quesadilla what oregano is to Italian seasoning. Without it, the spice blend tastes generic rather than distinctive.
Flour Tortillas: Use large 10-inch flour tortillas for this chicken quesadilla recipe — they provide enough interior surface to hold a generous filling when folded in half without the filling spilling out over the edges. Smaller 8-inch tortillas work but require less filling per quesadilla. Corn tortillas are thinner, more brittle, and do not fold without cracking — they require a different assembly technique. Use flour for this folded skillet method.
Why This Cheese Blend Works
Cheddar melts into a dense, intensely flavored layer with a slightly oily surface and good browning at the edges where it contacts the skillet. On its own, it can become greasy rather than stretchy.
Mozzarella melts into a smooth, stretchy layer that pulls into satisfying strings when a wedge is lifted or torn. Its flavor is mild — pleasant but not distinctive on its own in a spiced chicken quesadilla context.
Combined at equal parts, the two cheeses produce a layer that has both the sharp, complex flavor of the cheddar and the satisfying, stretchy pull of the mozzarella. This combination is consistently better than either cheese alone for a chicken quesadilla.
Bell Peppers: Any color bell pepper works — red, orange, and yellow peppers are sweeter and produce a milder flavor contrast with the spiced chicken. Green bell peppers are slightly more bitter and assertive, adding a counterpoint to the rich cheese. A mix of colors produces the most visually attractive finished chicken quesadilla. Slice into strips no wider than ½ inch so they soften evenly in the 2 to 3 minute sauté time.
Required Equipment
This chicken quesadilla recipe is built for a single skillet. The equipment list is short and every item matters.
10-inch or 12-inch Skillet (cast iron or non-stick)Cutting Board and Sharp KnifeMixing BowlWide Spatula or TongsPizza Cutter or Sharp Knife for Slicing
A cast iron skillet produces the best exterior crust on a chicken quesadilla — its even heat retention produces a uniformly golden tortilla surface without hot spots that burn one section while another stays pale. A non-stick skillet works equally well for the tortilla-crisping phase and is easier to manage for the chicken cooking step.
A wide spatula — at least 5 inches across — is necessary for flipping without the quesadilla unfolding mid-flip. Slide the spatula firmly under the entire bottom surface of the folded quesadilla before lifting and flipping in one smooth motion.
A pizza wheel cuts through a cooked chicken quesadilla more cleanly than a knife — the rolling motion produces clean wedges without dragging the filling out of the cut edge. A sharp chef’s knife with a rocking cut works as a close second.
How to Make Chicken Quesadilla — Step by Step
Thirteen steps from raw chicken to sliced, plated chicken quesadilla wedges. Total time is 20 minutes. The same skillet handles both the filling and the quesadillas.
1
Cut the Chicken Into Bite-Sized Pieces
Place the chicken breasts on a cutting board. Cut into uniform ½ to ¾ inch pieces — work in strips first, then cross-cut for even cubes.
Uniform size is essential. Mixed sizes produce dry small pieces alongside undercooked large ones in the same skillet. All pieces should look roughly the same size when spread on the cutting board side by side.
2
Season the Chicken With All Six Spices
Place the cut chicken pieces in a bowl. Add the chili powder, paprika, garlic powder, cumin, salt, and black pepper directly to the chicken.
Toss until every piece is evenly coated. The seasoned chicken should appear uniformly amber-red with no plain white pieces visible in the bowl.
3
Cook the Chicken Until Lightly Browned
Heat 1 tablespoon of olive oil in a skillet over medium heat. Add the seasoned chicken in a single layer — do not crowd.
Cook for 5 to 6 minutes, stirring occasionally, until all pieces are cooked through and the edges are lightly browned. Properly cooked quesadilla chicken is firm when pressed, shows no pink in the center when cut, and has visible golden-brown color on at least two surfaces of each piece.
4
Remove the Chicken and Set Aside
Transfer the cooked chicken to a clean plate or bowl. Do not wipe the skillet — the residual spiced oil left in the pan will flavor the vegetables in the next step.
Cover loosely with foil to retain heat while the vegetables cook.
5
Sauté the Bell Peppers and Onion
In the same skillet over medium heat, add the sliced bell peppers and diced onion. Cook for 2 to 3 minutes, stirring frequently.
The vegetables are ready when the onion is translucent and slightly soft at the edges and the bell pepper strips have brightened in color and softened enough to bend without breaking when pressed with a spoon — but still hold their shape.
6
Remove the Vegetables and Wipe the Skillet
Transfer the sautéed peppers and onion to the plate with the chicken. Wipe the skillet clean with a paper towel held with tongs — remove the residual oil so the quesadilla tortilla crisps rather than frying in pooled fat.
This step is often skipped and is one of the main reasons homemade chicken quesadillas come out greasy rather than cleanly crispy.
7
Mix the Two Cheeses Together
Combine the shredded cheddar and shredded mozzarella in a bowl and toss to mix them evenly. Pre-mixing ensures every quesadilla gets both cheeses rather than one accidentally getting more cheddar and another getting mostly mozzarella.
Divide the cheese blend into 8 equal portions — 2 portions per quesadilla (one for the bottom layer, one for the top layer).
8
Place One Tortilla in the Skillet Over Medium-Low Heat
Return the wiped skillet to medium-low heat. Place one flour tortilla flat in the skillet.
Medium-low is the correct temperature for the quesadilla assembly — hot enough to crisp the tortilla, slow enough to allow the cheese to melt completely before the exterior burns. Resist the temptation to increase the heat to speed up the process.
9
Add the First Cheese Layer on One Half
Sprinkle one portion of the mixed cheese blend evenly over one half of the tortilla — from the center fold line to the outer edge. Leave the other half plain.
The cheese goes down first, directly on the warm tortilla surface, so it begins melting before the filling is added. The cheese layer should be visibly even with no thick clumps or bare spots across the covered half.
10
Add the Chicken and Vegetables on Top of the Cheese
Distribute a quarter of the cooked chicken and a quarter of the sautéed peppers and onion evenly over the cheese layer.
Keep the filling within the bounds of the cheese layer — do not pile it up near the fold edge or the outer rim. The filling should sit in a flat, even layer over the cheese — not mounded in the center.
11
Add the Second Cheese Layer and Fold
Sprinkle the second portion of cheese blend evenly over the filling. Then fold the plain half of the tortilla over the filling to create a half-moon shape.
Press the folded quesadilla down gently with the spatula to compress the filling slightly — this helps the two cheese layers make contact with the filling and begin bonding as they melt.
12
Cook 2 to 3 Minutes Per Side Until Golden
Cook the folded chicken quesadilla for 2 to 3 minutes on the first side without moving it. Then slide the wide spatula completely under the entire quesadilla and flip in one confident motion.
Cook the second side for 2 to 3 minutes. A properly cooked chicken quesadilla is deeply golden-brown on both flat surfaces — not pale yellow or spotty — and feels firm when pressed from above, with the cheese inside fully melted and no longer resistant to pressure.
13
Rest 1 Minute, Then Slice Into Wedges
Transfer the cooked chicken quesadilla to a cutting board. Rest for 1 minute before slicing — this brief rest allows the melted cheese inside to firm up slightly so it does not pour out of the cut edges when sliced.
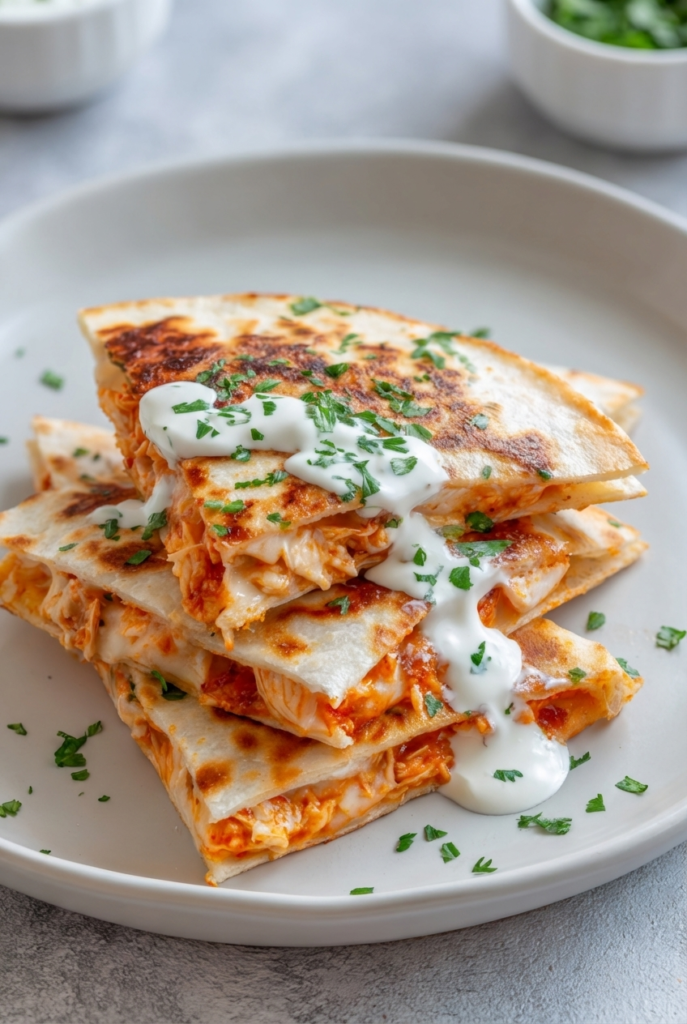
Cut into 3 to 4 wedges using a pizza wheel or sharp knife. Each wedge should show a clean cross-section of golden tortilla layers, stretchy melted cheese, and evenly distributed chicken and vegetable filling. Repeat the process with the remaining three quesadillas.
Dana’s Pro Tips for a Perfect Chicken Quesadilla
- Warm the tortillas for 20 seconds in the dry skillet before adding any filling. A briefly warmed tortilla is more pliable, folds without cracking at the fold line, and starts crisping from the first moment of contact with the skillet for the main cook. A cold tortilla pulled straight from the refrigerator cracks when folded and takes longer to reach the golden-brown stage.
- Do not overfill the quesadilla. The most common reason chicken quesadillas fall apart or produce uneven results is too much filling — the filling pushes the fold open, prevents full cheese contact with both tortilla layers, and causes the quesadilla to slide around during flipping. A thin, even layer of filling that does not approach the outer edge of the tortilla produces a much more cohesive, easier-to-flip result.
- Add 1 tablespoon of cream cheese to the cheese blend for extra creaminess. Cream cheese softens into the melted cheddar and mozzarella blend, producing a creamier, smoother interior layer that clings more readily to the chicken and vegetable filling. Use full-fat cream cheese and mix it into the shredded cheese blend before assembling.
- Use day-old or lightly dried shredded cheese rather than freshly shredded. Pre-shredded cheese from a bag contains anti-caking starch that actually helps the cheese melt more evenly and hold its shape better inside a quesadilla. Freshly grated cheese from a block melts beautifully but can release more oil and produce a slightly greasier interior. Both work — this is a preference note rather than a hard rule.
- For crispy edges, press the fold edge down firmly with the spatula during the first 30 seconds of cooking. The fold edge is the weakest structural point of a folded chicken quesadilla — pressing it firmly against the hot skillet for the first 30 seconds of cooking seals the outer edge, prevents the filling from spilling out during flipping, and produces a crisper edge compared to quesadillas that are left to rest loosely on the pan.
- Let the cooked chicken cool slightly before assembling. Very hot chicken placed directly on the first cheese layer melts the bottom cheese immediately and unevenly — some areas over-melt while others stay solid. Chicken that has rested for 2 to 3 minutes after cooking and is warm rather than steaming hot distributes its heat more evenly through the cheese during the quesadilla cooking process.
- Slice immediately before serving, never ahead of time. A sliced chicken quesadilla that sits for more than 5 minutes loses its exterior crispness rapidly as the steam from the hot interior softens the tortilla from the cut edges inward. Slice at the table or immediately before serving — never pre-slice and hold.
Common Mistakes to Avoid With Chicken Quesadilla
1
Cooking the Quesadilla at Too High a Heat
High heat crisps and burns the outside of the tortilla in 60 to 90 seconds — long before the cheese inside has melted. The result is a dark, over-done exterior with solid, unmelted cheese in the center. Medium-low is the correct heat for the quesadilla cooking phase. It takes longer but produces a uniformly golden exterior with fully melted cheese throughout.
2
Adding Too Much Filling
Overfilling pushes the fold edge of the quesadilla open during cooking, allows filling to fall out when flipped, and produces a bulging, uneven shape that does not press flat against the skillet. Thin, even filling layers that stay well inside the tortilla edge produce a chicken quesadilla that folds cleanly, flips without incident, and cooks evenly on both sides.
3
Using Raw Vegetables in the Filling
Raw bell peppers and onion release moisture as they cook inside the quesadilla. That moisture steams the tortilla from the inside, producing a soft, slightly wet interior crust instead of a crispy one. Always sauté the vegetables first — even 2 to 3 minutes drives off enough moisture to prevent this problem entirely.
4
Skipping the Skillet Wipe Between Steps
Residual oil from cooking the chicken and vegetables produces a pool of fat in the bottom of the skillet. Placing the tortilla directly into that oil produces a shallow-fried rather than dry-crisped tortilla — greasy and soft rather than clean and crunchy. Always wipe the skillet clean before placing the first quesadilla.
5
Flipping Too Early
A chicken quesadilla flipped before the bottom tortilla surface has fully set and crisped will unfold, allow filling to spill, and leave the bottom side pale and partially cooked. Wait the full 2 to 3 minutes until the bottom is visibly golden before attempting the flip. The quesadilla should feel firm and rigid when pressed with the spatula before flipping — not soft and yielding.
6
Slicing While Too Hot
Slicing a chicken quesadilla immediately off the skillet releases all the melted cheese at once through the cut edges — it pours out rather than holding in the wedge. A 1-minute rest allows the cheese to firm up just enough to hold its shape when cut, producing clean wedges with defined cheese layers rather than a molten mess on the cutting board.
Chicken Quesadilla Variations and Substitutions
Black Bean and Corn Version
Add ¼ cup of rinsed canned black beans and ¼ cup of corn kernels to the filling alongside the sautéed peppers and onion. Both can be added directly from the can or bag with no additional cooking. The black beans add protein and earthiness while the corn adds sweetness and textural contrast. This version is filling enough to serve as a complete meal with a simple side salad.
Spicy Jalapeño Version
Add 2 tablespoons of diced pickled jalapeño to the filling or 1 fresh jalapeño, seeded and thinly sliced, sautéed with the bell peppers and onion. Increase the cayenne in the chicken seasoning from zero (base recipe) to ¼ teaspoon. Use pepper jack cheese in place of mozzarella for the spiciest possible chicken quesadilla without making a separate spice blend modification.
BBQ Chicken Version
Replace the six-spice blend with 2 tablespoons of your favorite barbecue sauce mixed directly into the cooked, slightly cooled chicken. Use a combination of smoked gouda and cheddar in place of the cheddar-mozzarella blend. The smoky sweetness of the BBQ sauce and the gouda produces a completely different flavor profile that kids and adults both love — a reliable crowd-pleasing variation on the base chicken quesadilla.
Rotisserie Chicken Shortcut
Skip the chicken cooking entirely. Use 2 cups of shredded meat from a store-bought rotisserie chicken — white meat, dark meat, or a combination. Toss the shredded chicken with the full six-spice blend and 1 tablespoon of olive oil, then microwave for 60 seconds to warm and bloom the spices before assembling. This version reduces total cook time to 10 minutes and produces an equally flavorful chicken quesadilla.
Gluten-Free Version
Replace the flour tortillas with large gluten-free flour tortillas or with certified gluten-free corn tortillas. If using corn tortillas, the folded method requires the tortilla to be slightly warmed and pliable first — 20 seconds per side in a dry skillet before filling. Alternatively, use two corn tortillas flat like a sandwich press on both sides of the filling rather than folding one tortilla over.
Sheet Pan Batch Version
To make 4 chicken quesadillas simultaneously, brush one side of each flour tortilla with olive oil, place oil-side down on a parchment-lined sheet pan, add filling to one half of each, fold over, and bake at 400°F for 8 to 10 minutes, flipping once at the halfway mark. The sheet pan method produces a slightly different crust texture than the skillet — less deeply golden on each side but perfectly crispy and practical for feeding a crowd.
Quick Substitution Reference
No cheddar? Pepper jack cheese substitutes at the same quantity with the addition of mild to moderate heat. Colby jack at the same quantity produces a milder, creamier result. Avoid American cheese slices — they melt but produce a processed, rubbery texture rather than the stretchy, layered melt of natural shredded cheese.
No flour tortillas? Large gluten-free flour tortillas substitute directly. Corn tortillas require the two-flat-tortilla sandwich approach rather than the folding method. Whole wheat tortillas work with a slightly nuttier flavor and denser texture.
Chicken thighs vs. chicken breasts: Thighs stay juicier and are more forgiving with timing. Breasts produce a leaner, slightly firmer bite. Both make excellent chicken quesadillas — the seasoning, cook time, and assembly steps are identical for both cuts when cut to the same ½ to ¾ inch size.
How to Store and Reheat Chicken Quesadilla
Store leftover chicken quesadilla wedges in an airtight container in the refrigerator for up to 3 days. Place a piece of parchment paper between layers if stacking wedges to prevent them from sticking together as the cheese re-solidifies.
To reheat and restore the crispy exterior, place the cold wedges in a dry skillet over medium heat for 2 to 3 minutes per side. No oil needed — the fat in the cheese provides enough surface lubrication. The tortilla crisps back up remarkably well using this method and the cheese re-melts through the center.
Oven reheating also works well. Place wedges on a wire rack set over a sheet pan in a 375°F oven for 8 to 10 minutes until hot through and re-crisped. The rack allows hot air to circulate under the wedges and prevents the bottom surface from becoming soft on contact with a flat pan.
The microwave is the only reheating method that does not work for chicken quesadilla — the steam it generates softens the tortilla irreversibly within 30 seconds, converting the crispy exterior into a soft, slightly chewy layer that no amount of subsequent skillet time can fully restore.
The cooked chicken and vegetable filling stores well separately from the tortillas for up to 4 days. Keep the filling refrigerated in a sealed container and assemble fresh quesadillas as needed — each one takes only 5 to 6 minutes to assemble and cook in the skillet from pre-made filling.
Serving Suggestions for Chicken Quesadilla
With sour cream and fresh guacamole
Alongside a chunky tomato salsa or pico de gallo
With a simple Mexican rice on the side
Topped with sliced avocado and fresh lime
With a side of refried beans for a complete meal
Alongside a shredded cabbage slaw with lime dressing
With hot sauce and pickled jalapeños on the side
Cut into smaller pieces as a party appetizer
Building the Complete Plate
The classic restaurant chicken quesadilla plate — 3 wedges, a ramekin of sour cream, a ramekin of salsa, and a small guacamole portion — is the most complete presentation and takes under 5 minutes to assemble if the condiments are prepped while the quesadillas cook.
For a family dinner, serve one full folded quesadilla per person alongside Mexican rice and a simple side salad. The rice and salad take no additional active cooking time if made while the chicken and vegetables cook in the skillet.
For a crowd, cut each chicken quesadilla into 6 smaller wedges rather than 3 to 4 large ones and serve as a platter appetizer. Eight quesadillas from a double batch produce 48 small pieces — enough for 12 to 16 people as a starter.
Nutrition Estimate Per Serving
Based on 4 servings. One serving is one complete folded chicken quesadilla — one tortilla, half the cheese blend divided across 4 quesadillas, one-quarter of the chicken and vegetable filling. Does not include sour cream, guacamole, or salsa.
| Nutrient | Per Serving |
|---|---|
| Calories | 490 kcal |
| Macronutrients | |
| Protein | 44g |
| Total Carbohydrates | 36g |
| — Dietary Fiber | 2g |
| — Total Sugars | 3g |
| Total Fat | 18g |
| — Saturated Fat | 9g |
| — Trans Fat | 0g |
| Vitamins and Minerals | |
| Cholesterol | 115mg |
| Sodium | 720mg |
| Potassium | 560mg |
| Calcium | 38% DV |
| Vitamin C | 22% DV |
| Vitamin A | 18% DV |
| Iron | 14% DV |
| Niacin (B3) | 70% DV |
Values are estimates based on 2 large chicken breasts divided across 4 quesadillas, 1 cup each of cheddar and mozzarella divided across 4 quesadillas, 4 large 10-inch flour tortillas, and the vegetables and olive oil as listed. Adding 2 tablespoons of sour cream per serving adds approximately 50 calories and 5g of fat. Adding ¼ avocado per serving adds approximately 80 calories and 7g of healthy monounsaturated fat. The high protein content — 44g per quesadilla — makes this a genuinely filling meal rather than a light snack despite its moderate calorie count.
Chicken Quesadilla — Frequently Asked Questions
How do you make a chicken quesadilla crispy?
Three steps produce a genuinely crispy chicken quesadilla. First, wipe the skillet clean after cooking the filling — residual oil makes the tortilla soft and greasy rather than crispy. Second, use medium-low heat for the quesadilla cooking phase — 2 to 3 minutes per side allows the exterior to develop deep golden color without burning. Third, do not overfill — thin, even filling allows the tortilla to press flat against the skillet surface across its entire area, producing uniform crispness rather than crispy edges with a soft, domed center.
A brief 1-minute rest before slicing also prevents the melted cheese from escaping through the cut edges and softening the tortilla from the inside out.
What is the best cheese for chicken quesadilla?
A combination of shredded cheddar and shredded mozzarella at equal parts produces the best result for a chicken quesadilla. Cheddar provides sharp, tangy flavor. Mozzarella provides the stretchy, pliable melt that produces the satisfying cheese pull when a wedge is lifted. Neither cheese produces both qualities on its own.
Pepper jack substitutes for the mozzarella if you want heat in the cheese layer. Smoked gouda substitutes for the cheddar in the BBQ chicken variation for a smokier profile. Avoid American cheese slices — they melt but produce a processed, rubbery texture rather than a natural stretch.
What temperature do you cook a chicken quesadilla at?
Cook the chicken itself over medium heat — hot enough to brown the surface in 5 to 6 minutes without drying the interior. Cook the assembled, filled quesadilla over medium-low heat — lower than the chicken cooking temperature.
Medium-low gives the cheese inside time to melt completely before the tortilla exterior burns. The entire quesadilla cooking process at medium-low heat takes 4 to 6 minutes total — 2 to 3 minutes per side.
Can I make chicken quesadillas in the oven?
Yes. Brush one side of each flour tortilla with a thin layer of olive oil. Place oil-side down on a parchment-lined sheet pan. Add filling to one half, fold over, and bake at 400°F for 8 to 10 minutes, flipping once at 5 minutes.
The oven method produces a slightly different crust texture than the skillet — it is consistently crispy across the entire surface rather than having the deeper golden color that direct skillet contact produces. The oven method is the better choice when making more than 4 quesadillas at once.
Can I use corn tortillas for chicken quesadilla?
Corn tortillas can be used but require a different assembly method. They are thinner and more brittle than flour tortillas and crack when folded cold. Warm each corn tortilla in a dry skillet for 20 seconds per side until pliable before filling.
Rather than folding, use two corn tortillas — place one flat, add the filling, then lay a second tortilla on top to create a sandwich. Press firmly with the spatula on both sides. This produces a slightly thicker chicken quesadilla with a denser, cornier flavor profile and a crunchier bite than the flour tortilla version.
How long does it take to make a chicken quesadilla?
From start to plate, this chicken quesadilla recipe takes 20 minutes total — 5 minutes of prep (cutting and seasoning the chicken), 5 to 6 minutes cooking the chicken, 2 to 3 minutes sautéing the vegetables, and 4 to 6 minutes per quesadilla in the skillet.
Using pre-cooked rotisserie chicken reduces the total time to approximately 12 to 14 minutes — just the vegetable sauté plus the quesadilla cooking time.
Why does my chicken quesadilla fall apart when I flip it?
A chicken quesadilla falls apart during flipping for three main reasons. Overfilling is the most common — too much filling pushes the fold edge open and the quesadilla unfolds mid-flip. Flipping too early is the second — the bottom tortilla has not yet set and crisped enough to hold its shape, so it flexes when lifted and the filling shifts. The third is pressing down onto the top surface when flipping rather than gripping from the side with a wide spatula.
Wait until the bottom is visibly golden and the quesadilla feels rigid when pressed before attempting the flip. Slide the spatula fully under the entire bottom surface and flip in one confident, swift motion.
Can I meal prep chicken quesadillas ahead of time?
The best meal prep approach for chicken quesadilla is to cook and refrigerate the filling — seasoned chicken and sautéed vegetables — separately from the tortillas and cheese for up to 4 days. When ready to eat, assemble and cook a fresh quesadilla in 5 to 6 minutes.
Fully assembled and cooked quesadillas can be refrigerated for up to 3 days and reheated in a dry skillet or the oven. Avoid the microwave — it irreversibly softens the tortilla. Pre-sliced and stored wedges reheat slightly less well than whole stored quesadillas because the cut edges allow more moisture transfer during storage.
The Chicken Quesadilla That Belongs in Your Weekly Rotation
Cut the chicken evenly. Season all six spices before it hits the pan. Cook the vegetables first — never add them raw. Double the cheese layers. Medium-low heat for the quesadilla itself. Two to three minutes per side. One minute rest before slicing.
Those steps produce a chicken quesadilla with a genuinely golden, crispy tortilla on both sides — melted, stretchy cheese throughout — and well-seasoned chicken in every single wedge.
Follow me on Pinterest for more delicious recipes.